Grandma Pease’s Chocolate Pie


I know I claim many different foods are my favorites, and they are in certain categories, but this, this is my favorite food. Ever. Like if I could eat anything in the world right now, or basically any other moment of my life, this would be it. If I knew what my last food would be on this earth, I’d pick this. (But oh how I hope God has chocolate pie in heaven.) My mom’s fried chicken comes close, very close, to being on the top of my list, but this chocolate pie, the ultimate chocolate pie, takes the cake.
I’m sorry, Mom, but I know you understand.
My grandma used to make fried chicken every Sunday after church for her family and a chocolate pie for dessert. Seriously, it doesn’t get any better than that. I would love to do that here at The Bird House, if I could ever get a handle on those two dishes. And if I started a regular exercise routine.
I have to warn you that attempting this pie may prove frustrating if you expect perfection the first time. What I’ve learned about my grandma’s cooking is that it’s more of an art than just simply following a recipe. Even though she’s written down some of her recipes for me, they never turn out like hers the first time. Or the second. Or the third…what I’m saying, things this good require practice.
So don’t give up. Because when you do get it, oh how sweet it is.
Here’s a glimpse into the process. I don’t have more pictures of the filling because you can’t stop stirring it while it’s cooking or you’ll have a big mess on your hands. I was way too nervous to put down my spoonula and pick up the camera. I hope you understand.
The cast of characters for the pie crust. There’s twice as much shortening because I was making two crusts that day, one for a quiche, one for the pie. (Someday I’ll get around to posting about the quiche. Delicious!)

And here’s what my two crust dough balls looked like before I rolled them out.

The unbaked crust. Yes, it is quite obvious that I have no clue how to properly crimp the edges of the crust to make it look pretty. I try and try, but it always looks awful. I do know, however, that this in no way affects the taste, so no worries if you’re crimp-ignorant like me.

Meet baked pie crust. Again, I know it’s not pretty, but you won’t even notice once the filling and meringue are in there. I promise. Unless you’re Martha Stewart, then, well, I’m just sorry.

Once the crust is baked, pour the filling right on in there. (A note about cooking the filling: I’ve had better results with my pudding setting if I cook it on medium-high heat so it cooks faster. My grandma cooks hers over medium heat for a longer period of time and she gets hers to set, but for some reason when I do it that way mine’s always too runny. All that to say, just experiment and see what works for you.)

And now I’m just showing off. I love that my new camera captured a picture of the steam coming off the pie. An exciting day at The Bird House, I tell ya.

Make the meringue and spread over the filling. This makes up for all my unprettiness in the crust, don’t you think? (And for the record, my grandma only uses 2 egg whites and 4 tablespoons of sugar for the meringue and hers always comes out perfect. I, on the other hand, have failed every single time in actually being able to make enough meringue to cover my pie, so I gave up and make more and it works wonderfully.)

Bake your meringue until it’s golden and beautiful. And savor every bite of a big slice of this, the most delicious chocolate pie.

The Most Delicious Chocolate Pie
recipe from my Grandma Pease
- Details
- Ready in 0 Minute.
- Makes: 6 Servings
- Ingredients
- For the crust:
- 1 cup flour
- a little salt
- 1/3 cup shortening
- ice water
- For the filling:
- 1/4 cup flour
- 1 scant cup sugar
- a little salt
- 4 tablespoons cocoa
- 2 cups milk
- 2 egg yolks
- 1 teaspoon vanilla
- 2 tablespoons butter
- For the meringue:
- 3 egg whites
- a little salt
- 6 tablespoons sugar
- Directions
- Preheat oven to 425 degrees.
- Mix together first three crust ingredients (flour, salt and shortening) and then stir in water until you have a pie dough consistency (more on the dry side, you definitely do not want this to be really wet and sticky).
- Form dough into a ball and roll out into a circle that will cover the bottom and sides of a pie pan. Transfer to pie pan (I do this by rolling it up on a rolling pin and then unrolling it over my pie dish.) Press dough into pan.
- Bake until crust is a light golden brown, usually it is done right around the time the filling is completed, but make sure to keep an eye on it.
- After you put the crust in the oven, mix the dry filling ingredients in a medium saucepan (flour, sugar, salt and cocoa).
- Add 1/2 cup milk to the dry ingredients and mix well. Add the egg yolks and mix well. Then add the rest of the milk and mix well. Cook over medium to medium-high heat until thickened, stirring constantly.
- Once filling is thick, remove from the heat and add vanilla and butter. Stir until combined.
- Pour filling into the baked pie crust and set aside.
- Now for the meringue, beat egg whites a bit and then add salt and sugar and continue beating until soft peaks form. Spread over pie filling and bake until top of meringue turns a light golden brown.
- Serve warm or at room temperature.
You may also like:
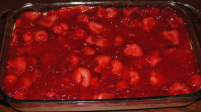
Strawberry and Chocolate Jiggle-Fluff Pie
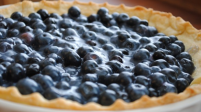
Blueberry Pie
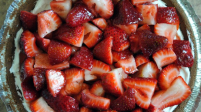
No-Bake Fresh Strawberry Pie
2 Responses to “Grandma Pease’s Chocolate Pie”
About
 I'm Vanessa and I have quite the soft spot for great food. I am a little bit addicted to trying new recipes and will share all the best ones with you.
Visual Cookbook
Hi , I was doing a web search and this site came up. I have an old banjo with a signature on it by a Red Pease. Just wondering if any of your family members was named Red. Well, at least I know how to make a delicious pie.
I’m not sure, I’ll have to ask my grandma.